Since each custom molded product is unique, it is extremely important that dimensional tolerances for each feature be established before any tooling is produced. Product designers must take care to avoid using “title block” tolerances because rubber parts, due to the inherent nature of the material, can seldom be produced to meet these tolerances.
In order to address these issues, the Rubber Manufacturers Association published “The RMA Rubber Handbook” back in 1958. The current revision (2005) can be found at www.rma.org. Afer reviewing various rubber manufacturing topics of particular interest, here are the Standard Dimensional Tolerance Tables for Molded Rubber Products.
High Performance Seals' standard tolerances for custom molded parts conform to Table 3, A2 of the RMA Handbook. “A2” tolerances denote an excellent quality, precision product. Molds must be produced with an exceptional degree of accuracy, and close inspection of the finished product is normally required. High Performance Seals verifies each dimension of your custom molded part using a 3-D, non-contact, computerized vision system.
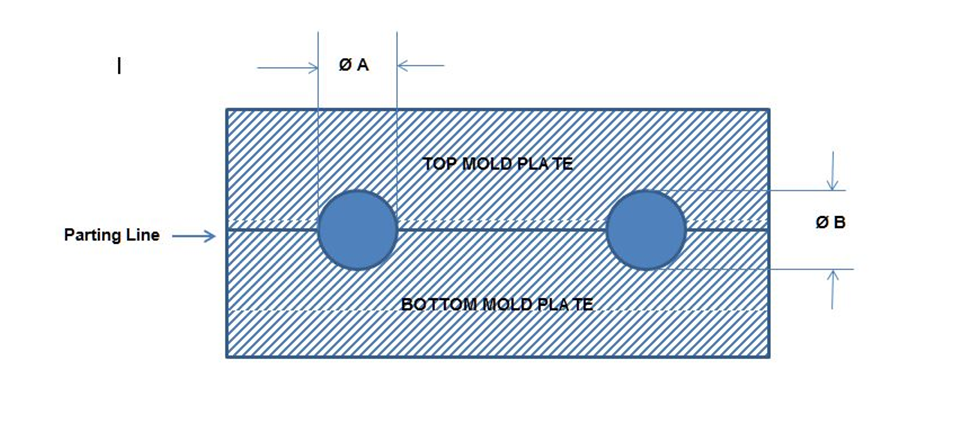
The table below designates High Performance Seals' standard dimensional tolerances for rubber molded products. There are two tolerances specified for each feature, "Closure" and “Fixed." Closure tolerances apply to features affected by the opening and closing of the mold plates due to variation in flash thickness. Fixed tolerances are not so affected.
A simple illustration of these two types of features is shown in the simple O-Ring illustration below. For feature “A” (the radial cross-section), fixed tolerances would apply; for feature “B” (the axial cross-section), closure tolerances apply.
| Feature Size (mm) | Fixed | Closure | Feature Size (in) | Fixed | Closure | ||
| Above | Thru | Tolerance mm) | Above | Thru | Tolerance (in) | ||
| 0 | 10 | ±0.16 | ±0.20 | 0.00 | 0.40 | ±.006 | ±.008 |
| 10 | 16 | ±0.20 | ±0.25 | 0.40 | 0.63 | ±.008 | ±.010 |
| 16 | 25 | ±0.25 | ±0.32 | 0.63 | 1.00 | ±.010 | ±.013 |
| 25 | 40 | ±0.32 | ±0.40 | 1.00 | 1.60 | ±.013 | ±.016 |
| 40 | 63 | ±0.40 | ±0.50 | 1.60 | 2.50 | ±.016 | ±.020 |
| 63 | 100 | ±0.50 | ±0.63 | 2.50 | 4.00 | ±.020 | ±.025 |
| 100 | 160 | ±0.63 | ±0.80 | 4.00 | 6.30 | ±.025 | ±.032 |
| Over 160 mm, multiply by | 0.004 | 0.005 | Over 6.30 inch, multiply by | 0.004 | 0.005 | ||

For more critical applications, High Performance Seals can provide you with custom molded parts according to Table 2, A1 of the RMA Handbook. A1 is the tightest industry tolerance classification and designates an exceptionally high precision product. These type products require expensive molds, diligent in-process controls, fewer cavities per mold, and specialized inspection procedures. For detailed information about A1 tolerances, contact our Customer Service Department.


